前言
在Angular2当中使用类似于指令、管道、服务等功能都需要先引入,例如我们在home.component.ts组件中使用某个管道,首先需要引入
import { MyUppercasePipe } from '../pipes';
然后在装饰器中添加pipes配置,最终才能在模板当中使用这个功能
import { Component } from '@angular/core';
import { MyUppercasePipe } from '../pipes';

@Component({
    selector: 'my-home',
    template: '<div>{{title | myUppercase}}</div>',
    pipes: [MyUppercasePipe]
})
export class HomeComponent {
    title: string = 'home component';
}
在Angular1当中,当我们在某个模块下定义了filter,在当前模块下就可以随意使用了,无需作任何声明。
那么在Angular2当中是不是也同样如此?拿上面的例子来说,HomeComponent的子组件是不是无需配置pipes可以直接使用myUppercase?
Pipes
新建一个child.component.ts,不配置pipes,直接使用myUppercase管道功能
import { Component } from '@angular/core';

@Component({
    selector: 'my-child',
    template: '<div>{{title | myUppercase}}</div>'
})
export class ChildComponent {
    title: string = 'child component';
}
home.component.ts修改如下
import { Component } from '@angular/core';

import { MyUppercasePipe } from '../pipes';
import { ChildComponent } from './child.component';

@Component({
    selector: 'my-home',
    template: `
        <div>{{title | myUppercase}}</div>
        <my-child></my-child>
        `,
    pipes: [MyUppercasePipe],
    directives: [ChildComponent]
})
export class HomeComponent {
    title: string = 'home component';
}
打开浏览器,会发现控制台抛出了异常
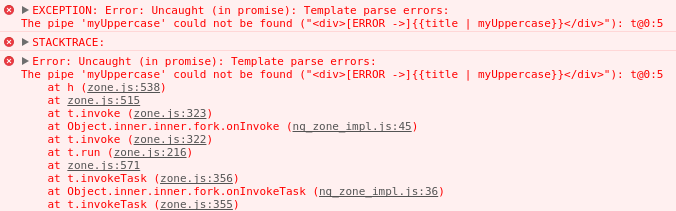
很明显,ChildComponent当中无法识别myUppercase,我们再修改child.component.ts如下
import { Component } from '@angular/core';

import { MyUppercasePipe } from '../pipes';

@Component({
    selector: 'my-child',
    template: '<div>{{title | myUppercase}}</div>',
    pipes: [MyUppercasePipe]
})
export class ChildComponent {
    title: string = 'child component';
}
打开浏览器,发现正常工作了。所以说子组件无法使用父组件配置的Pipes,每次使用都得单独配置。
Directives
看完了管道的传递模式,我们再来看下指令。新建一个my-highlight.directive.ts,当鼠标移动到元素上时,背景色变红,鼠标移出恢复原样
import { Directive, ElementRef, HostListener } from '@angular/core';

@Directive({
    selector: '[myHighlight]'
})
export class MyHighlightDirective {
    defaultBgColor: string = 'none';

    @HostListener('mouseenter')
    onMouseenter() {
        this.elRef.nativeElement.style.backgroundColor = 'red';
    }

    @HostListener('mouseleave')
    onMouseleave() {
        this.elRef.nativeElement.style.backgroundColor = this.defaultBgColor;
    }

    constructor(private elRef: ElementRef) {
        this.defaultBgColor = elRef.nativeElement.style.backgroundColor;
    }
}
父组件home.component.ts当中引入该指令,并添加配置
import { Component } from '@angular/core';

import { MyHighlightDirective } from '../directives';
import { ChildComponent } from './child.component';

@Component({
    selector: 'my-home',
    template: `
        <div myHighlight>{{title}}</div>
        <my-child></my-child>
        `,
    directives: [ChildComponent, MyHighlightDirective]
})
export class HomeComponent {
    title: string = 'home component';
}
子组件child.component.ts当中不添加配置,直接使用该指令
import { Component } from '@angular/core';

@Component({
    selector: 'my-child',
    template: '<div myHighlight>{{title}}</div>'
})
export class ChildComponent {
    title: string = 'child component';
}
打开浏览器查看效果,控制台没有报错,但是子组件鼠标移入移出没有任何效果。再次修改子组件代码
import { Component } from '@angular/core';

import { MyHighlightDirective } from '../directives';

@Component({
    selector: 'my-child',
    template: '<div myHighlight>{{title}}</div>',
    directives: [ChildComponent, MyHighlightDirective]
})
export class ChildComponent {
    title: string = 'child component';
}
这时子组件正常工作了。所以子组件无法使用父组件配置的Directives,每次使用都得单独配置。
Services
新建一个logger.service.ts,主要是打印格式化的日志
import { Injectable } from '@angular/core';

@Injectable()
export class LoggerService {
    constructor() {
        console.log('New LoggerService');
    }

    log(str: string) {
        console.log(`Logger: ${str}`);
    }
}
父组件home.component.ts当中配置并注入该服务
import { Component } from '@angular/core';

import { LoggerService } from '../services';
import { ChildComponent } from './child.component';

@Component({
    selector: 'my-home',
    template: `
        <div>{{title}}</div>
        <my-child></my-child>
        `,
    directives: [ChildComponent],
    providers: [LoggerService]
})
export class HomeComponent {
    title: string = 'home component';

    constructor(loggerService: LoggerService) {
        loggerService.log('HomeComponent Constructor');
    }
}
子组件child.component.ts当中不配置,直接注入该服务
import { Component } from '@angular/core';

import { LoggerService } from '../services';

@Component({
    selector: 'my-child',
    template: '<div>{{title}}</div>'
})
export class ChildComponent {
    title: string = 'child component';

    constructor(loggerService: LoggerService) {
        loggerService.log('ChildComponent Constructor');
    }
}
打开控制台输出如下
New LoggerService
Logger: HomeComponent Constructor
Logger: ChildComponent Constructor
说明子组件可以直接注入父组件配置的服务,看控制台输出,很明显注入的是同一个实例,如果我们也给子组件添加上providers配置会怎么样? 你会发现控制台输出如下
New LoggerService
Logger: HomeComponent Constructor
New LoggerService
Logger: ChildComponent Constructor
子组件不添加providers配置和父组件注入的是服务的同一个实例,如果添加了配置,则注入了一个新的实例
Global
每次使用自定义Pipes、Directives和Services时,都得单独引入,有没有办法只配置一次,然后整个应用都可以使用呢?
Angular2提供了PLATFORM_DIRECTIVES和PLATFORM_PIPES方便我们添加全局的指令和管道。
例如上面的例子,我们在入口main.ts作出如下修改
import { bootstrap }      from '@angular/platform-browser-dynamic';
import { PLATFORM_DIRECTIVES, PLATFORM_PIPES } from '@angular/core';

import { MyHighlightDirective } from './app/directives';
import { MyUppercasePipe } from './app/pipes';
import { LoggerService } from './app/services';
import { HomeComponent }   from './app/home.component';

bootstrap(HomeComponent, [
    [{provide: PLATFORM_DIRECTIVES, useValue: [MyHighlightDirective], multi: true}],
    [{provide: PLATFORM_PIPES, useValue: [MyUppercasePipe], multi: true}],
    [LoggerService]
]).catch(err => console.error(err));
然后就可以在应用程序中直接使用自定义的指令、管道和服务了
import { Component } from '@angular/core';

import { LoggerService } from '../services';

@Component({
    selector: 'my-home',
    template: `
        <div myHighlight>{{title | myUppercase}}</div>
        `
})
export class HomeComponent {
    title: string = 'home component';

    constructor(loggerService: LoggerService) {
        loggerService.log('HomeComponent Constructor');
    }
}
The End.